
Twisting is part of our normal and natural range of motion. It’s an important part of our functional movement. Maintaining a healthy and mobile spine has physiological benefits, too, because our spine houses our spinal cord. But despite the benefits of twisting, our range of motion in this plane is often limited. Just try to turn your head to the right and then to the left. You’ll probably notice that your movement feels a little stiffer in one direction than the other. Twisting in yoga is a core range of motion, too. I consider twists to be one of the five main categories of postures. This is the category of postures that probably gets the least amount of attention, however. In this article, we’ll try to rectify that. We’ll dive deeper into what makes a twist work and look at the benefits and cautions for twisting.
What’s in this article?
Anatomy of a twistThe spine
Pelvis and hips
Shoulders
What restricts or prevents twisting?Muscles
Fascia
Bones
TechniqueStanding twists
Seated twists
Binding
Proportions
Breathing in a twist
Building more complex twists
Issues, cautions, and injuries SI joint pain and low back pain
Low back pain
Hip pinching
Disc herniations
Anatomy of a twist
First, let’s talk about where twisting in yoga happens in our body. The ideal twist happens primarily in our spine. In contrast to forward bending, where I say that the pose is about ⅔ hip flexion and ⅓ spine, an ideal twist is something more like ⅔ spine and ⅓ or less hip or pelvic movement. Within our spine, we can get more specific. The shape of the vertebrae, the way they fit together, and the directions that they glide at the facet joints are different in each section of the spine.
The spine
Remember, we can divide the spine into three broad sections: the cervical spine (neck), the thoracic spine (mid-back), and the lumbar spine (lower back). There are seven vertebrae in the cervical spine. The thoracic spine has 12 vertebrae. And there are five vertebrae in the lumbar spine. While there are some intermediate shapes of vertebrae where each of these sections transitions into the next section, generally, the vertebrae are shaped differently in each section. Because of their shape and the orientation of the facet joints where they meet, the vertebrae in each section of the spine have an easier or harder time gliding in a way that allows a twisting motion.
In the lumbar spine, the facet joints are perpendicular to the sagittal plane. When we twist, the facet joints quickly start to bump into each other. For that reason, we have a very small range of motion in the transverse plane (twisting) in the lumbar spine. Our range of motion in twisting in the lumbar spine is just a few degrees in either direction. However, in the thoracic spine, our facet joints are oriented roughly parallel to our back (coronal plane). So we can twist much farther in our thoracic spine before restriction occurs.
We have to remember that the thoracic spine has ribs associated with it and therefore the tension of the ribs will eventually restrict gliding of the facet joints. That assumes that the ligamentous structures surrounding the facet joints haven’t stopped movement already. For that reason, most of our twisting in the thorax happens from our thoracic spine. The shape of our cervical vertebrae allows our head to move easily in all planes. So, we can easily rotate our head right and left if there are no myofascial restrictions preventing it.
Pelvis and hips
Although an ideal twist happens mostly from our thoracic spine, our pelvis and shoulders are still involved in the twisting motion, at least tangentially. How much the pelvis or shoulders contribute to twists in yoga depends on the pose we’re doing and our particular body.
Our hip joints are ball-and-socket joints, so they allow rotation. Where our spine meets our pelvis is at the sacroiliac joints (SI joints). A very small amount of gliding occurs at these two joints. So, we can create some part of a twisting action from our hips and the connection of our pelvis to our spine. As you likely know, the SI joints are also prone to issues. That’s important to know when you are assessing twisting in yoga. Depending on the pose and the person, you may or may not want to allow, restrict, or encourage twisting to happen in different areas of the body.
Shoulders
Our shoulder girdle can also be part of our twisting action in yoga, particularly when we add binding to a posture. When we place our shoulder on the outside of our knee, or even put our hand on the floor to support us in a twist, we tend to use these connections as leverage. That leverage has an impact on how much twisting we do from the thorax and how much pressure or force we can or want to create in our thoracic spine. This is often why binding in a twist can make it harder to breathe. With the binding as leverage, the force and pressure through the rib cage increase.
What restricts or prevents twisting?
Muscles
At a minimum, twisting in yoga involves our whole torso. So, tension in just about any muscle group along our torso can impact our ease in twisting. Those muscles could especially include the intercostals, internal and external obliques, erector spinae, deep spinal muscles/paraspinal muscles like multifidus, and latissimus dorsi. The interesting thing about twists is that, because of the nature of the movement, we are always lengthening muscles along one side of our body while shortening/contracting muscles on the other side. So the same muscles may be part of twisting us into a posture on one side and resisting further twisting from the other side.
Fascia
Tension in layers of fascia on our torso can also restrict twisting. An example of that is the
thoracolumbar fascia that is integral with our latissimus dorsi and wraps around our back. Keep in mind that fascia is continuous not just with the muscles but also with the bones themselves through the outermost layer of connective tissue on the bones (periosteum). As a result, the connective tissue on the ribs (not technically fascia) is integrated with the intercostals and the sheet of connective tissue on both the inside and outside of the rib cage. All of which are firmly held with just connective tissue.
Bones
Finally, remember that each vertebra is also attached to a pair of ribs. That means the articulations of rib to vertebrae need to be mobile. The joint capsule that surrounds that articulation (more connective tissue), and the muscles that we’ve mentioned that also cross that joint, need to have movement available to them or they will also potentially restrict twisting in yoga. Then there is the rib itself. As a fairly rigid bony structure, the ribs will also restrict our twist at some point during the motion. After all, they are designed to protect what is inside them (heart and lungs). At some point, too much movement would start to create trouble for those very important structures.
Technique
Standing twists
Establish your base in the feet
Standing twists have the same foundation as any other standing pose, your feet. So it makes sense to start there. Without a stable base underneath you, it’s hard to work more specifically with restrictions to twisting in yoga. In standing twists like revolved triangle and revolved side angle, take a look at your feet. Set your feet up in a way that you feel balanced and steady before you start to twist. If you’re having difficulty balancing, try a shorter length (front foot to back foot distance) and a wider width (distance from left to right between the feet).
The pelvis
After you’ve established your base (your feet), the next important piece as we make our way up the chain is the legs, and then the pelvis. In standing twists, our hamstrings, lateral gluteal muscles, and lateral hip rotator muscles can all be part of restricting where we can go in the pose. This is because the movement is part forward bending and part twist. Tension in your hamstrings can affect how your pelvis is oriented. And tension around your hips can affect the position of your pelvis and ultimately how much twisting in yoga is available. It can also affect where you’re twisting from, whether that’s more from the hip joints or more from the spine. Opening the hips can especially have an impact on standing twists.
Giving up one thing for another
As we’re putting together the pieces of our standing twists, it’s important to remember that twisting is a whole-body movement. All of the pieces that come together to make a complex standing twist, like revolved side angle for example, may not be accessible right away. In the short term, as you are learning and evolving your standing twists, you may have to give up one thing for another.
In revolved triangle, you might want to connect your hand to the floor, but in order to do that, you may have to let your pelvis rotate a little bit. If you want to prioritize keeping your pelvis squared to the front of the mat or parallel with the floor, then you may not be able to reach your hand to the floor initially. Neither of these options is right or wrong. The key here is to consider which option would best serve you or the student you’re working with.
Debunking the myths
There are a few cues that come up specifically related to standing twists. One in particular that comes up frequently is the myth that your feet, heels, or insteps should be lined up in poses like revolved triangle and revolved side angle. Realistically, that very narrow base doesn’t work for most practitioners. If your hips are at all tight, you aren’t going to be able to balance as easily on that narrow base, and it’s going to restrict movement at your pelvis because the tissues will already be lengthened just to maintain that position.
Consider your intention in the yoga pose. Is it to work on twisting? Then broaden your base in a way that makes it feel stable to you. That allows you to take your focus off of just staying upright and balanced, and instead put your focus on the twist. Additionally, check that your feet aren’t crossed. That means, if you draw a line from the front of your mat to the back, ideally your right foot will be a little to the right of that line and your left foot will be a little to the left of that line
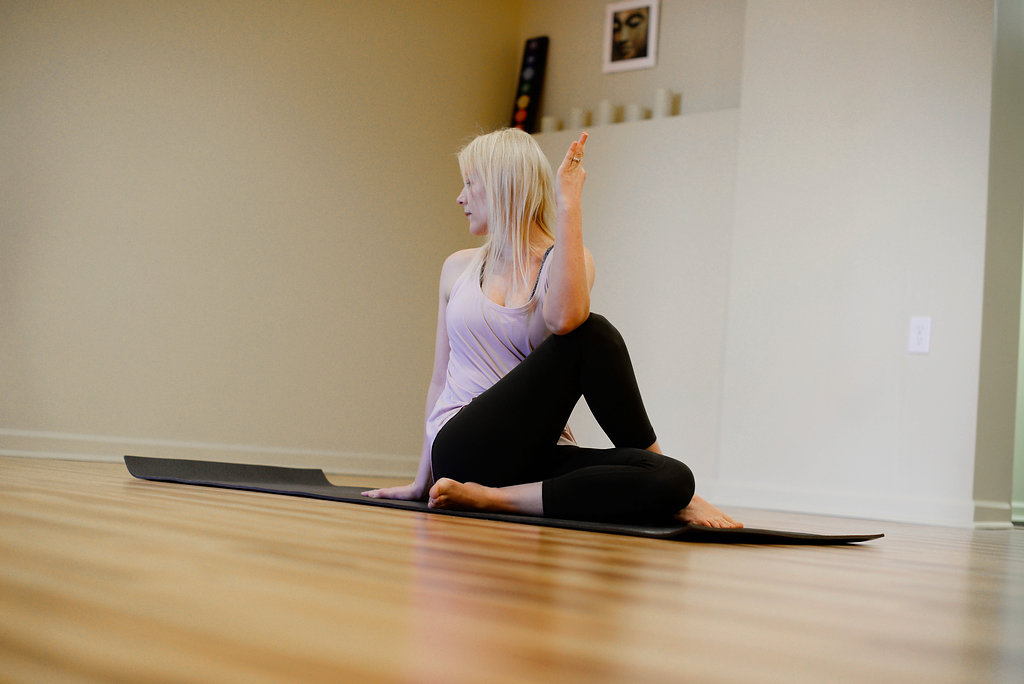
Seated twists
When we’re seated, our base is no longer our feet, it’s what we’re sitting on. Because our spine sits on top of our pelvis, our pelvic position can influence how much twist we can find in our body. It can even affect how much of our arm is available to bind. If we take a posture like Marichyasana C or ardha matsyendrasana, for example, a strongly posteriorly tilted pelvis will take our spine with it. That’s going to effectively take our torso away from the knee that we’re trying to twist around. In contrast, if we take our pelvis more toward a more neutral position, we’ll be closer to our knee, making both twisting and binding easier.
Binding
Binding is the action of wrapping our arm or arms around, usually our knee or leg, to then connect to the floor or connect our hands together. It’s the last step in some versions of standing or seated twists. It builds on the other pieces of setting up our twist. First, we have to set up our pelvis in a way that brings our torso as close as possible to the knee or leg we want to bind around. Getting your torso to your knee is essential, whether you are binding a standing twist like revolved side angle and trying to get your hand to the floor, or wrapping your arm around your knee in a seated twist like binding Marichyasana C or D. The closer we are to what we want to bind around, the smaller the distance we’re trying to cover as we wrap around it.
The armpit to knee relationship
That brings us to the second important part of binding, which is establishing our armpit to knee relationship. The more firmly connected we keep our armpit area to the surface we’re trying to bind around, the easier it will be to bind. The closer we get our armpit to our knee, the more of our arm we have to work with as we’re trying to rotate it around and make a connection, either to the floor or to our other hand.
Once we have our pelvis, torso, and shoulder in place, our arm and hand may still not reach all the way to where we’d like to reach to. In this case, you can set up an intermediate stage of binding for yourself. If you’re trying to reach the floor, try putting a small block under your hand as an option. If you’re in a seated pose and trying to reach around your knee to connect your hands, try holding the ends of a small towel until you eventually have the flexibility to connect one hand to the other. Assemble your bind and consider intermediate steps to grow this process for yourself.
Proportions
Tibia versus femur length
Our proportions affect the specific relationship of our torso and limbs to each other. Let’s use Marichyasana C as an example. Imagine if you had a very long tibia compared to your femur, or the reverse, a long femur compared to your tibia. You could probably see how that would change whether your sit bone on the leg with the bent knee would easily or not so easily meet the floor. With a longer femur and shorter tibia, our sit bone on that leg would rest closer to the floor. With the opposite, a longer tibia and shorter femur, our sit bone would be more likely to float a little off the floor.
We sometimes hear teachers suggest that the sit bones should always be on the floor in Marichyasana C. If we think about how proportions could change where our pelvis and the top of our leg meet the floor, we can see how it’s unrealistic to expect that everyone’s sit bones are going to meet the floor. It’s one thing to have an intention of “trying to ground the sit bone” for the purpose of creating length through the spine. It’s another thing to say that everyone “should” have their sit bone on the floor.
Femur versus torso length
We can also look at the effect of the relationship between our femur length and torso length in Marichyasana C. If we have a long torso relative to our femur, then when we sit up tall, our armpit is going to be higher than our knee. This means we have to make some choices when it comes to binding the pose.
If we want to wrap our arm around our leg, we’re going to have to bend over a little bit to hook our armpit around our knee. If we sit all the way up, our arm will slide off. So, we have to choose which thing to give up in order to allow the other. Do we want to sit up as tall as possible, or do we want to make the connection with the bind? Neither is right or wrong. They will each create a different effect. We have to decide which effect is more of a priority for us in that particular moment.
Breathing in a twist
One of the most common questions about twisting in yoga is: Why is it so hard to breathe in a twist? The main reason brings us back to the rib cage, the bones themselves, as well as the myofascial connections. Remember, as we twist, the ribs are going to “deform” to a degree at their connection to the vertebrae and the sternum. This essentially loads the bones themselves with additional tension. This “deformation” makes it harder for the bones to move and be lifted by air moving into the lungs.
In addition to that is the fact that one set of muscles that we use to twist are also muscles that we use to breathe. When we breathe, the intercostal muscles help lift the ribs up and out to make space for our inhale. But when we twist, these muscles are lengthened on one side and shortened on the other side. Twisting in yoga adds tension to these muscles, and we can feel that as resistance when we try to breathe during a twist.
The key to breathing during a twist is finding that happy medium between effort and ease. Twisting will stretch the intercostals, the muscles between the ribs that we use while breathing. So, in the long term, twisting can help create and maintain space for us to breathe fully. But in the short term, it’s helpful if we can find that edge where we are feeling some restriction, relax as much as possible, and breathe into it. Simply repeating that process will help develop the capacity to breathe more easily in twists over time.
Building more complex twists
In the twisting category of poses, there are also examples of more complex twists, like Marichyasana D and pasasana in the Ashtanga practice. Marichyasana D is especially complicated because it combines a half lotus and a twist. In pasasana, we’re binding not just one leg, but both legs. Anytime we start combining patterns, things get more complicated. With more complex twists, start slowly and establish the basic pattern comfortably in your body. Then, be consistent and build more complex patterns a little at a time.
Often, what makes these poses so challenging is not twisting per se. It’s combining additional patterns that may already be challenging, like a half lotus, for example, with twisting. In that case, I recommend taking the pose apart to look at what individual patterns are combined to create the pose. Work on each individual pattern on its own, then, when you have facility with the additional patterns, you can combine them into more complicated poses.
Issues, cautions, and injuries
SI joint pain and low back pain
Remember that our sacroiliac joint (SI joint) is the place where our spine connects to our pelvis. The sacrum is originally five individual bones at the base of our spine that become fused into a single bone, the sacrum, as we age. Where each side of the sacrum meets the iliac bone on the right and left sides of the pelvis, we have a joint, the right and left sacroiliac joints.
As I’ve already discussed in this article, twisting in yoga happens from both the hip joints and the spine. And at the sacroiliac joint, we meet the joint that transfers force between the spine and pelvis. So it’s possible for shear forces to be directed into the SI joint depending on the particular relationship of the spine to the pelvis. Those kinds of shear forces tend to show up more often in students who already experience some laxity or dysfunction of the SI joints.
If you’re experiencing SI joint pain in twists, experiment with how much you are twisting from your hip joints versus your spine. This essentially means let your pelvis move more during your twists, or purposely move your pelvis as part of your twist. Remember, the pelvis is moving at the two hip joints. So, moving your pelvis from your hip joints will put less pressure through the spine. This can often help alleviate pain at one or both SI joints during twisting.
Low back pain
Similarly to SI joint pain, general low back pain can occur for some students during twisting in yoga. The source is usually similar to what we see for SI joint pain. Shear forces can be directed into the low back depending on how your particular spine meets your pelvis. Because the shape of the vertebrae and facet joints in the lumbar spine doesn’t easily allow for much twisting, trying to force additional twisting through this area can also lead to pain.
Hip pinching
Hip pinching describes a sensation that students sometimes report in both standing and seated twists. This is a sensation that sometimes happens when students go deeply into poses like revolved side angle or Marichyasana C. I’ve spent many years helping students work through this issue. My best hypothesis for what is going on is a combination of contraction/shortening of the iliacus because the hip is flexed while simultaneously twisting. For some students, this can cause a sensation like something is being pinched deep in the front of their hip joint.
When this happens during a class, I will work with the student to directly palpate and lengthen their iliacus tissue. This usually solves the problem, at least in the short term. Keep in mind that it is also possible that something else is occurring. If you know you have a labral tear, for instance, you may get a small amount of relief from treating your own iliacus, however, you need to be more careful in this situation. When practicing on your own, you can do some self-palpation and exploration of your own iliacus to see if this is the source of the sensation you’re feeling. If it is, you can also work to lengthen this muscle through targeted lunge postures and other poses that open the hip flexors.
Disc herniations
With very significant herniations in the acute phase of the experience, people will most likely avoid yoga classes. But as they get further into the treatment phase of dealing with the herniation, they may want to incorporate yoga. Gentle twisting may be helpful if part of the cause is tight muscles, adding to whatever force has led to herniations. How much twisting in yoga is helpful versus potentially harmful is highly variable from person to person. Go slowly with small twists and be in communication with the student. The student is the best person to say whether twisting feels relieving or compressing. Additionally, allowing the pelvis to rotate more can help you find just the right amount of twist through the spine so that it’s not too much.
Conclusion
Twists in yoga require a complex series of relationships. They incorporate our whole body. While the spine is certainly the center of twisting, openness in our hips and shoulders also affects how easily we access twisting postures in yoga. We can make twists more complex by incorporating additional patterns like half lotus or by adding binding. But even basic twists help us maintain mobility in our spines.